Here I discuss how to add stencil support to shaders.
I’ll add stenciling support to the Standard Shader as an example. You can use the same code blocks to add stenciling support to your custom shaders.
Since Unity doesn’t allow you to edit its default shaders. You ll need to download them from Unity’s repository. Once downloaded, open up the standard shader.
This is the current link to their Archive. https://unity3d.com/get-unity/download/archive
Adding stencil support to a shader is not too complicated. Note, This method only works for a Vertex/ Fragment shader. For Unity’s own Surface shaders, you need a different setup. That setup is still a mystery to me.
A little bit of theory before we begin…
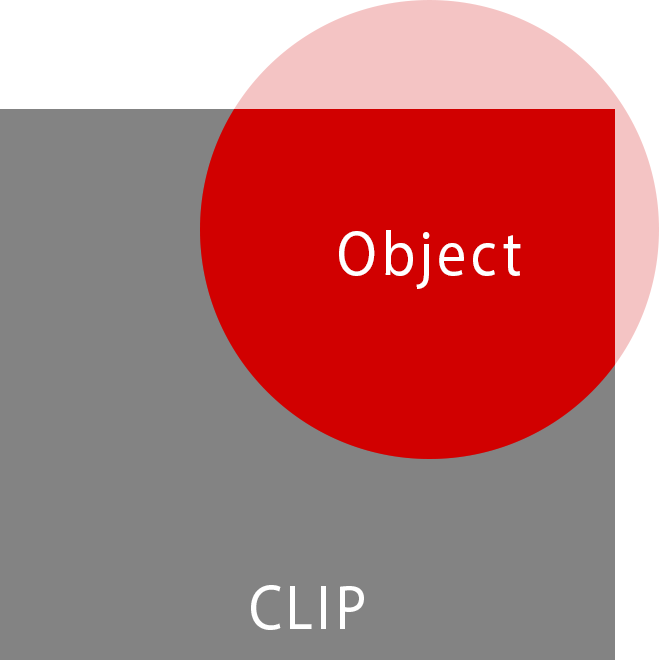
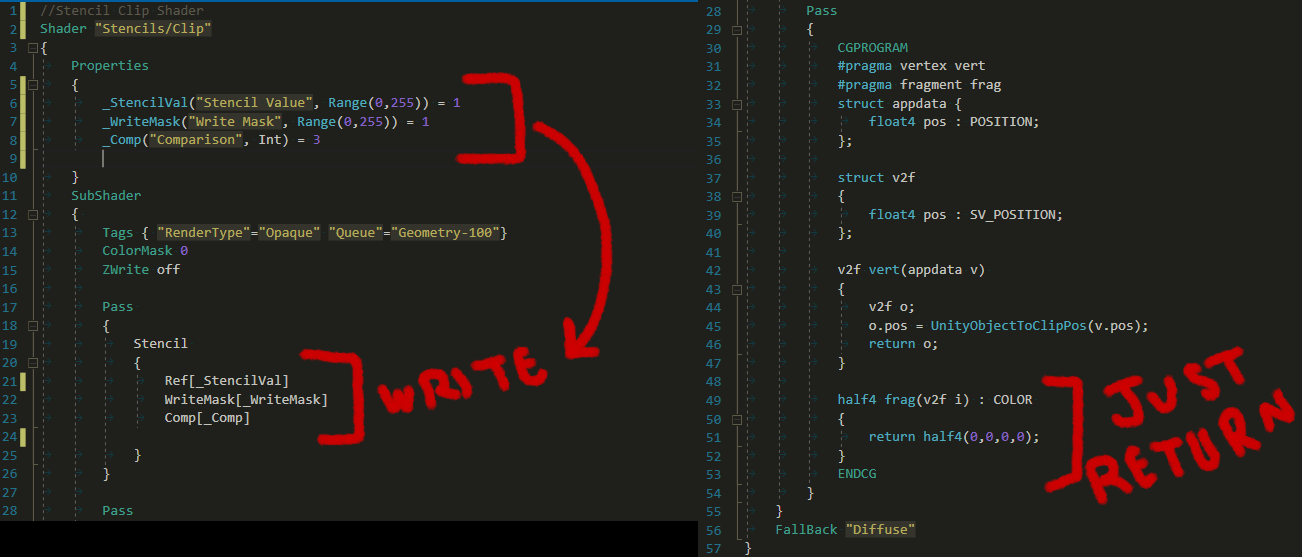
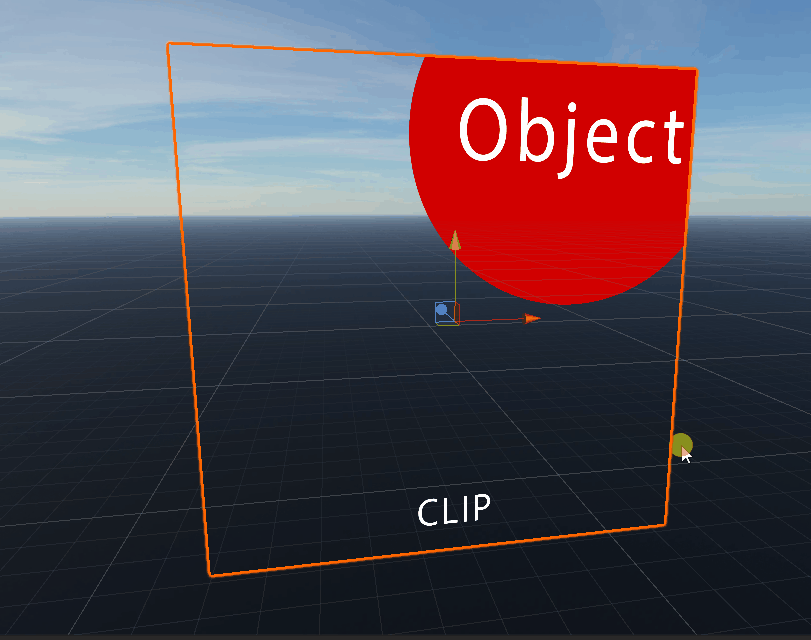
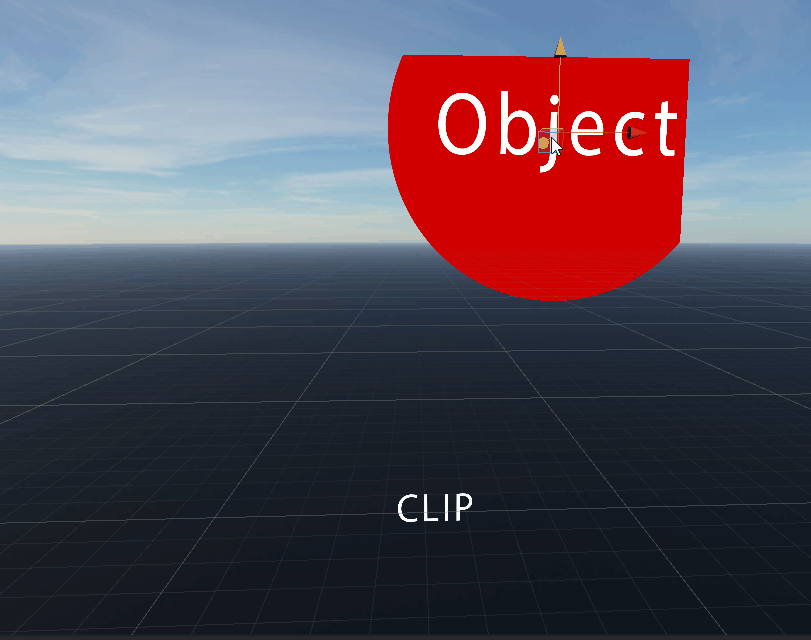
To start, you need to add stencil support to two shaders. One is the Object Shader (Standard Shader in this case) and the other is the Clip Shader on which the object will render. The Object shader performs the read operation, whereas the Clip performs the write operation on the Stencil Buffer. While the comparison operation decides how read and write will interact with each other.
So, that means there always two shaders depicting the stencil effect. Clip is a usually a plane mesh on which the Object shader renders. Each with values whose interaction is defined by their comparison type.
Now lets start editing the Object Shader which in this case is “StandardStencil.shader“
I’ll add 3 stenciling operations to the shader. Stencil Value, Read, Write and Comparison type. You can add as many more operations you like. https://docs.unity3d.com/Manual/SL-Stencil.htm
Object Shader:
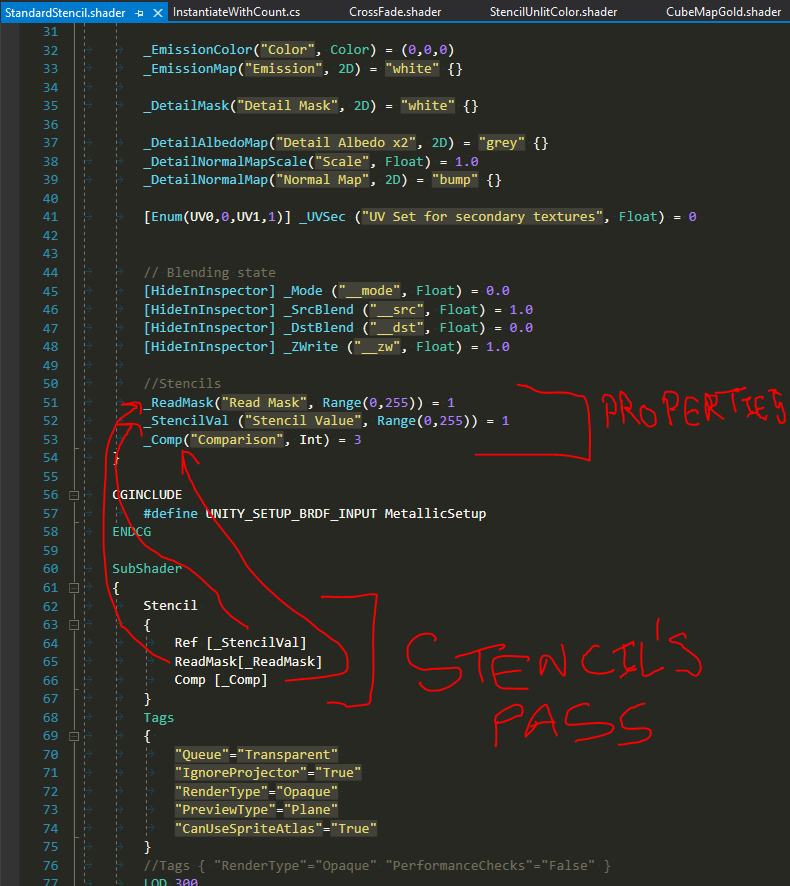
This code will go into your shader’s properties:
//Stencils_ReadMask("Read Mask", Range(0,255)) = 1_StencilVal ("Stencil Value", Range(0,255)) = 1_Comp("Comparison", Int) = 3
This code will go into your SubShader before any pass add:
Stencil{Ref [_StencilVal]ReadMask[_ReadMask]Comp [_Comp]}
With this the Object Shader Stenciling is complete. Its time to make a Clip Shader on which this object will render.
To make a shader, right click in Unity’s Project tab. Create >> Shader >> Unlit
Clip Shader:
Just like the Object shader add this to the properties of the Clip shader.
//Stencils_StencilVal ("Stencil Value", Range(0,255)) = 1_WriteMask("Write Mask", Range(0,255)) = 1_Comp("Comparison", Int) = 3
After this, inside your SubShader before any pass add:
Stencil{Ref [_StencilVal]WriteMask[_WriteMask]Comp [_Comp]}
You should be all set! Now you can start playing with Stencil values. This is where Binary math operations come in handy. To keep things simple in this example, match the values of the object shader with the clip shader. I set them to 1. Also, add object shader stenciling to all shaders that need stenciling.
Here’s a more in-depth article on using stenciling values. https://shahbazsekhon.com/unity-stenciling-primer/
You should be able to see the shader operations working by now.
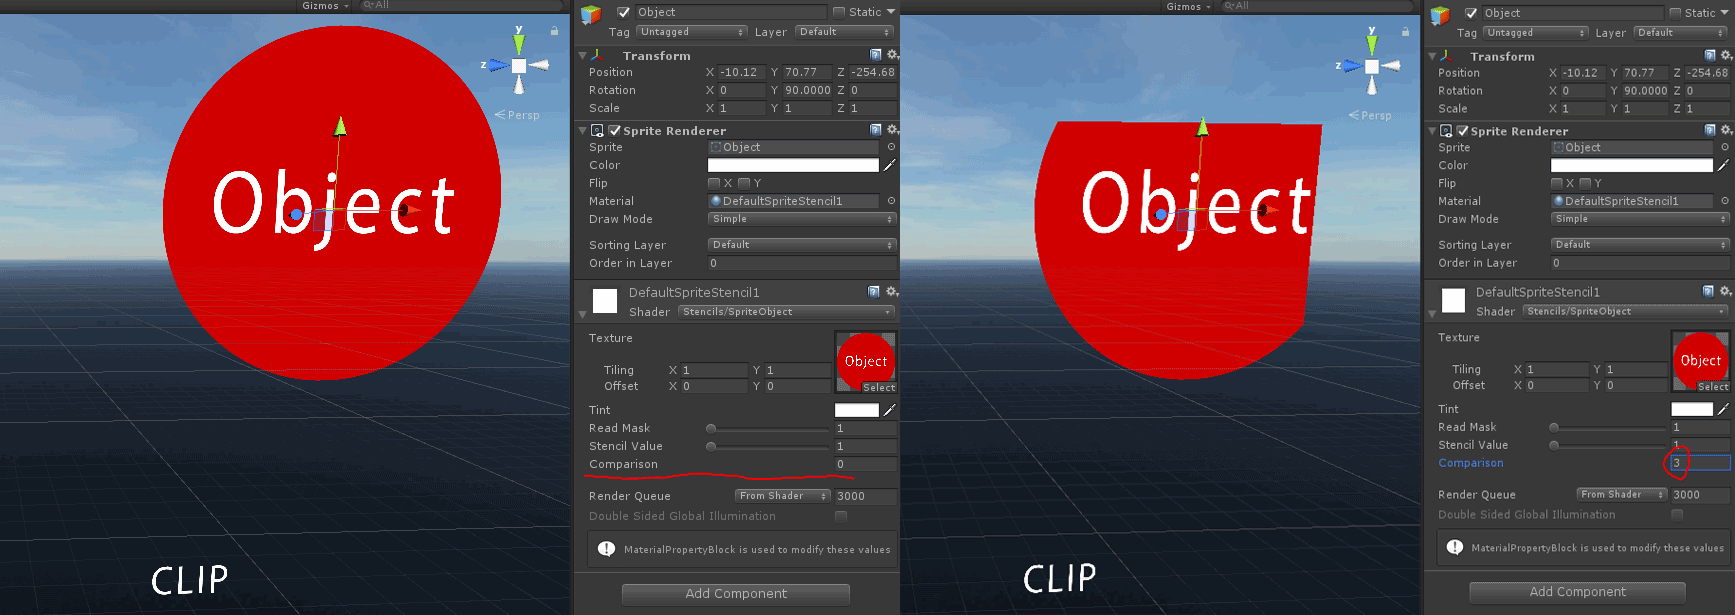
In-case, you replaced your Standard/custom shader with the Stenciled version, you might find yourself trying to turn Stenciling Off for some materials. Since some materials might not need stenciling. Forgoing the redundant option to create a stenciled and a non stenciled version of the same shader. You can do these steps below.
There is a way to completely ignore the stencil operations in the shader. You can add stencil support to a shader on materials and ignore its stencil operations. An example for this could be, all the meshes are using the “stenciled standard shader materials” but only some meshes need stenciling.
All you need to do is set the comparison to Never on those materials. This insures the stenciling values are ignored on them.
Essentially its an “On” and “Off” button for the Stencil operations.
What this meant for me is that, I was able to overwrite the shaders on an existing project. Set their default value to Never. Since the default was set to Never, the Stencil Test would not run. Hence the shader would behave just like it did before. Like it has no stencils on it.
So, remember set the default value to Never and overwrite those shaders!…at your own risk of course 🙂
For those editing the Standard Shader, there is one last thing that needs to updated. Note that this step is an exception to the Standard Shader and does not necessarily need to be performed on regular or custom shaders.
To see the stencil options in the inspector of the Standard Shader, a GUI file needs to be updated.
This file is called “StandardStencilShaderGUI.cs“. It’s usually found under Presentation>>Common>>Editor. Or just search for it in the project.
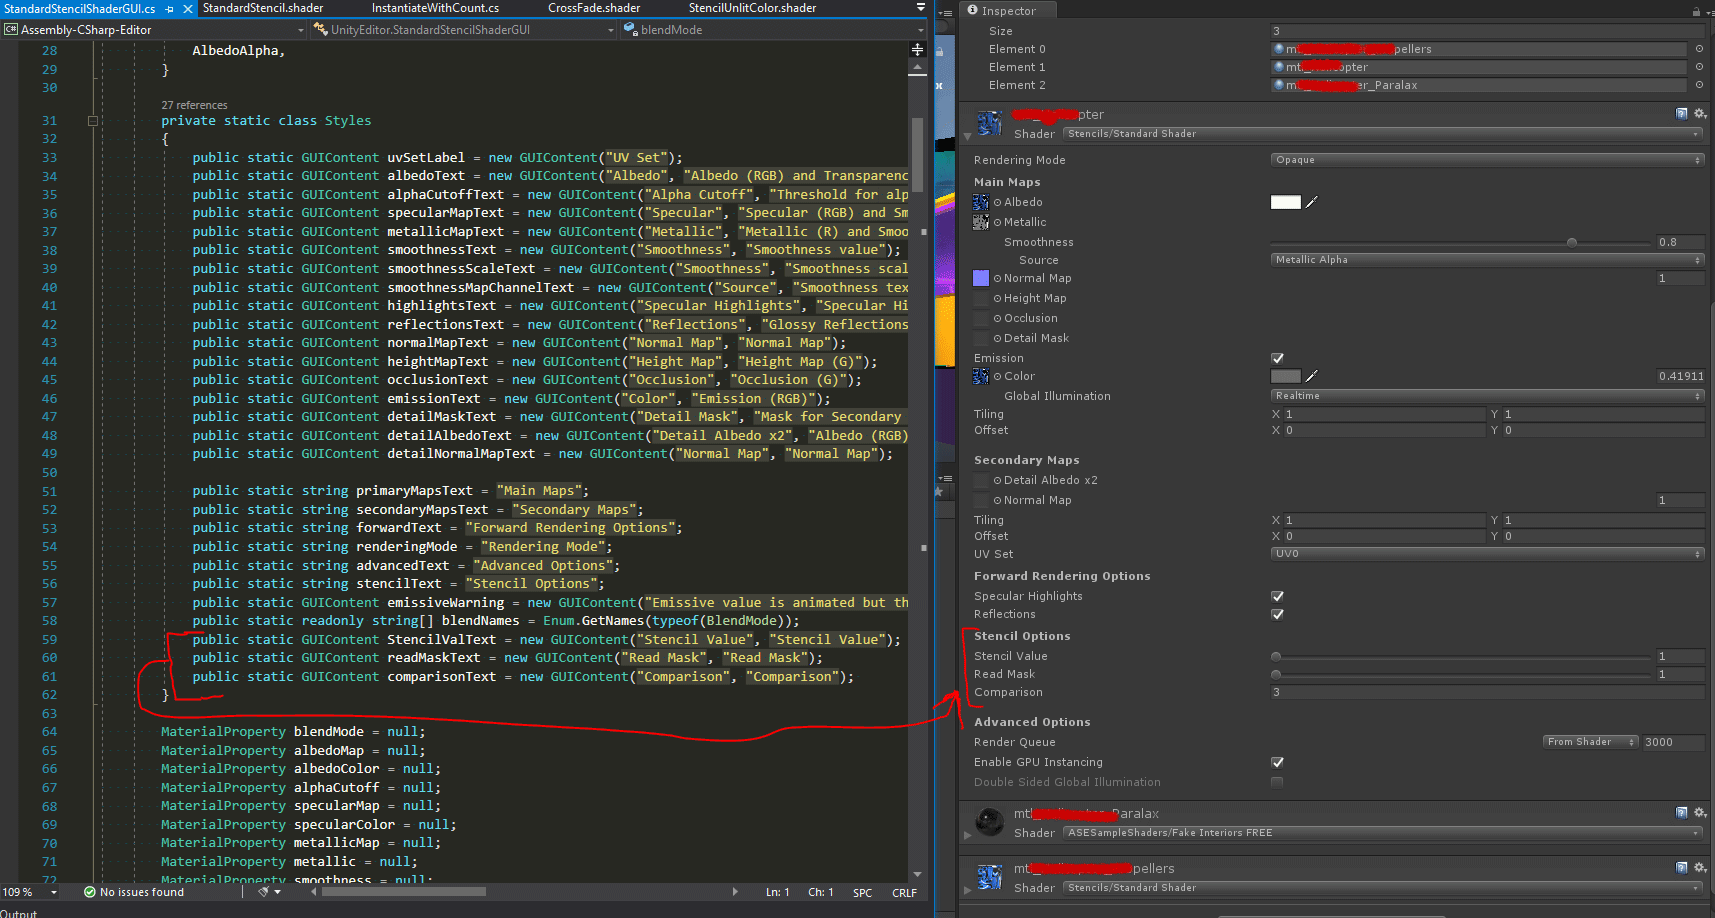
Add this code to the class Styles and your Standard Shader Inspector now has stenciling options!
public static GUIContent StencilValText = new GUIContent("Stencil Value", "Stencil Value");public static GUIContent readMaskText = new GUIContent("Read Mask", "Read Mask");public static GUIContent comparisonText = new GUIContent("Comparison", "Comparison");